Look what I learned to do today!
Posted: 2013/04/14 | Author: Lola | Filed under: Decorating | Tags: Dremel, Facebook Marketplace, PInterest, tile saw, wet saw, Wine bottle, Wine bottle cutting | Leave a commentToday I taught myself how to cut wine bottles using a wet tile saw. Mine aren’t nearly as pretty as I was hoping but now I get to learn a Dremel! I got through four plus cases pretty quickly.
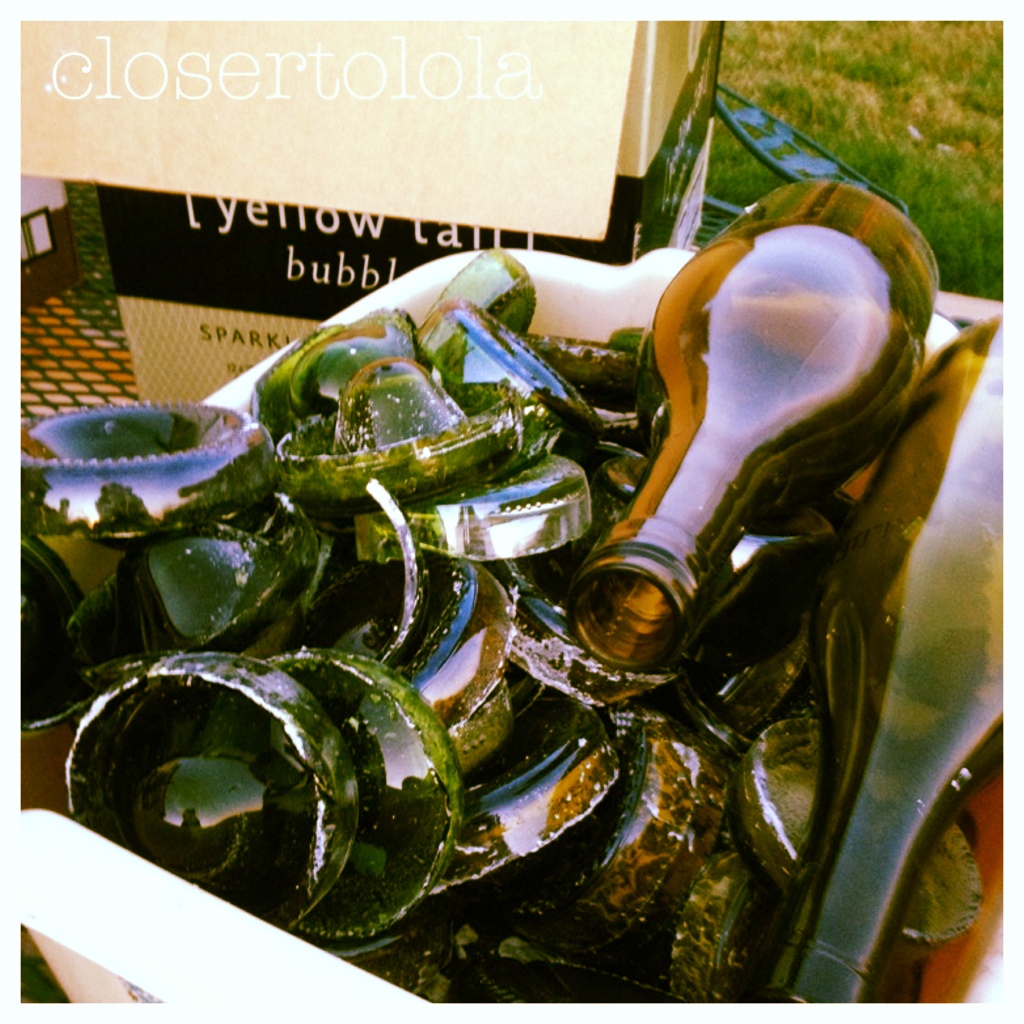
The blade was too small for the champagne bottles so I am selling them with the labels removed in hopes of paying for the blade. I quickly learned bottom cuts are WAY easier than top cuts. So I quickly abandoned the craft or vase idea for the wine party. Too much work, gone. I cut most of them as candle covers. They are a bit jagged and a little uneven. But this will be great as that style needs air to get under the bottle to work, instant air. Next I’m going to buy better Dremel drums and see if I can make them smooth and pretty, even if a little textured at the bottom.
Have a great week, I’m pooped and going to bed. Track season starts tomorrow and my shit is as is usual, not together.
Random Musings and detailed how to’s for the Halloween Decor
Posted: 2011/10/23 | Author: Lola | Filed under: Decorating | Tags: Decorating, Dremel, Ghost, Halloween, holiday decor, Holiday Decorating, jack-o-lantern, Trick or Treat | Leave a commentHello lovies! OK here are the how to’s for the Halloween Lawn decorations in this post and some of the rest of the Halloween/Fall Decor along with probably side bars and random musings about my week and life.
Little hanging ghosts
The little hanging ghosts are made of cut up sheets, styrofoam balls in various sizes, 2″,3″ and 4″ from the craft store and white pipe cleaners. Hang with filament or fishing line and for the bigger headed ones it helps to put a thumb tack or eye hook or screw tack if you can find them into the top of the head . Wrap the filament from the neck to the tack ont he top of the head and them those should hang a little straighter. I made these a few years ago, but I think I cut pretty large squares from 1-2 king flat sheets I bought at Target. They have held up really well and the edges now have a sort of frayed worn look which I think is pretty cool. Just this year we are finding that the filament needs to be changed or added to most of them. Now my savvy decorating neighbor who I totally stole this idea from also made ground ghosts. I don’t know for sure how she did it, but I imagine it could be done with the exact same materials plus a cut up small round dowel rod shoved and hot glued into the base of the Styrofoam ball head, like a little ghost lollipop. Hmmm, that gives me an idea for next year. We are pretty stuck to doing ghosts and spiders each year because I’m saving all of this stuff in my huge basement that’s never likely to get finished before my kids can enjoy it anyway. Of course, if we wait then I can claim it as Lola’s Boom Boom Room and make a long bench throne for the bad girls and I to sit on. I digress.
Big yard ghosts
The bigger ghosts are 4′ shim boards we used for the grid lines for the Square Foot garden. cut one end on an angle. The heads are those plastic store trick or treat pumpkins, Dremel out a notch in the bottom so they slide tightly onto the top of the stick. Cut off the plastic handles and then pound the whole thing in the ground with a rubber mallet. We tried lighting them from the inside of the heads this year with battery operated pumpkin lights, but it isn’t working so great. Next year I will try battery operated light up X-mas lights.
Now the sheets on the kid ghosts are all from Goodwill. In order to get the best results you really full size or larger. But I also scored a white tablecloth and a white shower curtain and I cut those worked just fine. Don’t shy away from mostly white sheets with a trim of something. I found two like that and just cut off the patterned trim edge. Also I had several sheets that were fitted, rather than flat. I needed a lot of white sheets and I made a round trip to 4 Goodwills to get white sheets. I cleaned all of them out of everything they had that might work because I didn’t know how lucky I would be at the next one. So I had probably 3 fitted sheets with the elastic edges. I cut the elastic off all around each of the fitted sheets. Guess what?! This gave me white elastic long and sturdy tying material for the necks of each ghost when I went to tie up the sheets to the heads. So if you are going to try this don’t shy away from those fitted sheets!
Spacing them is really a two person job , but I did it by myself on Friday morning before the contest because the Husband’s back is still out. I’ve been sleeping alone for over a week now, the flash backs are gone, but it’s at that really lonely but about to become what I’m used to stage. I hope he can sleep on his side soon :-(. I really don’t like sleeping alone, ever.
Ghost Jack- o-Lanterns
The ghost pumpkins are just regular jack o lanterns, carved with ghost faces and covered in a cut up sheer curtain panel from Goodwill. This is the only craft I designed myself. Everything else I stole from a decor savvy neighbor years ago or looked up online and put in Pinterest to try out this year. Left over sheer window panel made a great ghost costume for Edwin the spider. Who is hanging from the porch light and ringing the doorbell.
Fall tree and wreath
Oh, the Fall tree was also mine. I’d seen them in the craft stores and had one inside last year. This year I skipped that and drug the outdoor Xmas lighted porch tree outside early. It is shoved full of some of the same fall flower picks and pumpkins that I had in my stash. then I added the orange little lights and white ghost lights. I also put in a few spiders and a Halloween ribbon on the top. On November 1, I will pull all the Halloween off and put in the Thanksgiving fall stuff. Same concept with the grape vine wreath. I never glue anything to my grape vine wreaths because that way I can change them out as often as I like for less money and less storage.
Spiders
Here is a little background about the spiders. My Husband HATES SPIDERS! So being his loving family we of course think it is funny to torture him with them every Halloween. It started with Charlie and Beauregard and then this year we added umm, whatever we named the other 3. I’d add more to my collection but I don’t want two that are the same. I’ve got to take a trip to Micheal’s in search of a grey one. In the same fashion we have had the two plastic rats for years and years.
The big spiders are made from random balls around the house wrapped in either trash bags or landscaping fabric or both. Ours are anchored with spray painted black wood blocks to give them stability and also raise them up a bit all over or just in back. The legs are nothing more than 1″ PVC pipe, cut with a hacksaw very easily into legs. Then joined together with PVC joints. and covered in cut black pipe insulation. We left the knees white but if it bugged you one could spray them black as well. Then we cut those long tall bamboo or thin metal covered in green plastic poles for the garden into long spikes. For the 1’x1′ legs I cut them about 12″ or so long, so one 8′ pole in my garage made 8 spikes for anchoring the legs. For the 3’x’3′ legs we cut them about 18″ or so long. Then drive the spikes into the ground at a sever low angle to the ground very near the spider body. Slide the pvc legs onto the spike and repeat until you have all 8 legs on the ground.
The Husband took my cheapy black glitter spiders from Walmart and drilled a tiny hole in each one’s booty with a Dremel. Then we hung them from the ceiling of the porch . It’s difficult to capture on film and creepy as heck. I hope no one freaks out and falls off my porch, seriously.
Ghost Milk Jug Lanterns
This was a Pinterest project. It looked cute and sounded great. In reality it was a bit of a pain but I have a a great start now and can add as I like to them. First you have to beg everyone you know to save their milk jugs for you and get enough to make an impact. I suggest you start now for next year if you the all along the walk , the driveway, the front edge of the yard and maybe even the garden grandiose plans like I did. I ended up with enough, THANK YOU MILK JUG FAIRIES, to do both sides of the small walk way. Keep em coming lovies!
Anyway you need to rinse them out well. And just use a small exacto craft knife to cut a round hole near the back bottom edge . Then use a big smelly sharpie to get high, I mean draw cute/scary/KISS ghost faces on the front of the jugs. The whole family can help with this as you can see from our jugs. Hmm, just got another idea for next year. You could draw anything on the jugs and use this idea. Words, spiders, anything!!!! So it makes it a cute idea for more than just Halloween. I am rarely smart enough to come up with these kinds of realizations on my own, and you just got to witness one.
I put some river rocks in the bottom of each jug. I’ve had them in the bottom of my guest bathroom sink for a few months and they have been cleaned but needed a good airing out anyway. Then I used the big blue bulbs we have for our favorite Football team lights on the house during Xmas and shoved one in the back hole I cut. I played with the position and they looked best facing out toward our sidewalk and then in toward the path on along the house vs. facing each other.
I’m traveling this week for work, including a day of 10+ hours of back to back to back meetings. The kids have Fall break this week and I’ll be working from home while they play quietly in clean rooms, I mean drive me nuts Have a great week lovies!

